How do I install SyncQ in my HubSpot org?
SyncQ is available on both the Intacct and HubSpot marketplaces. You can install SyncQ from HubSpot by clicking on the following Link

SyncQ is available on both the Intacct and HubSpot marketplaces. You can install SyncQ from HubSpot by clicking on the following Link
Log in to your HubSpot account. Go to any Company or Contact or Deal record detail page. Then on the right look for the SyncQ Intacct Automation tab. Then click on the Intacct Sync link.
It will open a new tab for the SyncQ app home page. If you are logging in for the first time, SyncQ will send a verification code to authenticate. This is a mandatory
compliance requirement that cannot be bypassed/disabled.
 On the SyncQ app page, click on the Connect to Intacct green button. If you have connected your Intacct company earlier, select the Intacct company in the select drop down and then click
on Connect to Intacct green button.

No, HubSpot and Intacct users may be different. However, both users need to have admin rights to establish the Intacct connection.
Yes, you can connect multiple Intacct companies. However, you will need a separate SyncQ license to connect each Intacct company.
SyncQ does not currently support HubSpot sandbox. While it might be technically feasible to connect to a HubSpot sandbox, exercise caution, as there is a risk of overwriting your production data with incorrect connection mapping.
SyncQ supports all HubSpot Editions. However with HubSpot Free version, if you want to create an Estimate or Invoice, you have to fill the product line items manually from the SyncQ app record sync page. You cannot update or re-sync the Estimate or Invoice in the Free version.
To sync any HubSpot record to Intacct, the HubSpot user needs to have a SyncQ license. To sync from Intacct to HubSpot, SyncQ uses the admin user license who has
installed SyncQ in the HubSpot company.
One license is valid for connecting only one Intacct company. If you connect multiple Intacct companies, multiple SyncQ licenses are required against each user against each Intacct company connection.
To allocate SyncQ license to different HubSpot users, go to the SyncQ app page -> Click on the MySetting icon on the top right -> Go to the Manage Licenses section
 Click on the + or - to add or remove users. If you want to change SyncQ admin, contact support@syncq.net.
Yes, any HubSpot user with edit/read access to the relevant objects and fields can view synced data.
Yes, SyncQ offers a 14-day free trial. The trial automatically begins upon subscribing to a trial plan,
which requires linking your PayPal account (or using a Credit/Debit Card via PayPal). You
will not be billed during the trial period. If you wish to cancel, you can do so at any
time by logging into your PayPal account, using the SyncQ MySetting Unsubscribe option, or
contacting support@syncq.net.
After the 14-day trial period, automatic billing will commence. Please note that
payments are non-refundable once processed.
You can cancel the SyncQ subscription by canceling your recurring billing from your PayPal account or from the SyncQ MySetting Unsubscribe option.

Yes, you can pay by credit or debit card if you do not wish to use PayPal. In that case request SyncQ to generate a manual invoice. However, all manual billing is for annual subscriptions only. Payments once made will not be refunded.
To check if your Intacct connection is active or not, go to the SyncQ app home page, then select your Intacct company from the select dropdown. SyncQ should show your Intacct company
name in green, which means your Intacct connection is active. Reconnect if it shows in red.

If you disconnect and delete Intacct - HubSpot connection, SyncQ will no longer be able to sync data between your HubSpot and Intacct account.
This will also delete all mappings that you have created
against the Intacct connection. If you only disconnect, your mappings will stay stored.

1. Install SyncQ from HubSpot marketplace
2. Connect your Intacct Company
3. Create HubSpot Object to Intacct mapping
4. Modify the default field mapping or add new field mappings as per your requirements
5. The following field properties will be added automatically in each mapped HubSpot object. They are
Intacct Company : fill it with your Intacct Company name before syncing (for a single company it is not mandatory)
Intacct Id : which will hold the unique Intacct Id on successful sync
Intacct Seq : internal to SyncQ
Intacct Sync Status: will show the status of the Intacct sync. "Success" means record synced successfully.
Sync to Intacct: will be useful if you want full automation from HubSpot to Intacct
Add these properties in your HubSpot Object property view for easy reference.


6. To sync any record from HubSpot to Intacct, go to that specific record in HubSpot, click on the Intacct sync link on the right panel. This will open the SyncQ on a new browser tab.
7. Click on To Intacct green button

 8. Right Intacct green panel should be filled with synced data from Intacct.
 9. If the green panel is blank, check the Intacct Sync status field in the HubSpot record.
Yes, you can sync Intacct custom fields.


Yes, you can sync HubSpot custom fields.


SyncQ supports the following Intacct types : Customer, Vendor, Products/services, Estimate, Invoice, Sales Receipt, Purchase Order, and Bill. There are limitations on these mappings, you can
sync either account receivables or payables or both with limitations. For example, you cannot sync HubSpot Company as both Customer and Vendor. Similarly, Deal cannot be both Invoice and bill.


Purchase Order and Bill transactions are linked to a Vendor. You must create the Vendor first before syncing a Deal as a Purchase Order or Bill. You can sync both accounts receivable and payable transactions. However, it's not possible to sync a HubSpot Company as both Customer and Vendor simultaneously. You must choose one combination: either map HubSpot Company as Customer and Contact as Vendor, or vice versa.

To sync any Accounts Receivable transaction, the Intacct Customer must be synchronized
before initiating the synchronization of the deal as an Estimate, Invoice, or Sales Receipt.
Ensure your deal includes line items with products synced from Intacct. Multiple
mappings for a deal as an Estimate or Invoice are possible. In such cases, only syncing
from HubSpot to Intacct is supported; attempting a reverse sync may result in errors.
However, both Estimate and Invoice statuses can be synced back to the original deal as notes.

To sync any Accounts Payable transaction, the Intacct Vendor must be synchronized
before initiating the synchronization of the deal as a Purchase Order or Bill.
Ensure your deal includes line items with products synced from Intacct.
Please check the
deal to PO mappings as shown below.


After syncing any record from HubSpot, check the Intacct Sync Status field. If it shows "Success", meaning record has been successfully synced.

Go to the SyncQ app and then select your Intacct company. This will show the mapping you have created earlier. Against each mapping, there is a setup wheel button. Click on the setup
wheel against the Intacct record type that you want to sync from Intacct to HubSpot.

Yes, you can bulk import all your Intacct records into HubSpot.
You have two options:
Option 1: Sync as individual records. With the appropriate mappings, you can synchronize all your Intacct transactions to
HubSpot. To proceed, please follow the steps below and click the green 'Import' button. The duration of this operation may
vary depending on the size of your Intacct dataset. Additionally, a custom field named 'Intacct Id' is automatically
generated in your HubSpot object. You can add this field to your list view to easily distinguish records synced from Intacct.


Option 2: Import as notes in the Organization or Contact records. To enable this option, start by syncing all your
Intacct Customers from Intacct to HubSpot. Next, in your Intacct Customer mapping' setting option,
select 'Import Historical Transaction Data' and click 'Save' to activate
this feature.
SyncQ does not delete any record from HubSpot and Intacct. If you delete any record on Intacct, manually delete the corresponding record on HubSpot or delete the Intacct Id value. Similarly, if you delete any record on HubSpot, delete the corresponding record in Intacct.
Invoice currency is related to connected Intacct customers. You need to SET customer currency while creating the customer in Intacct. You cannot update customer currency once a customer is created. You can map the Customer currency reference field in Customer mapping. In the HubSpot side, you can create a drop-down field to specify the currency, for example, USD, CAD, AUD, etc.
Intacct customer record has only one mandatory field called Display Name. This field value is compared with the corresponding field value that is mapped on the HubSpot side. Typically, in
HubSpot Company to Intacct Customer mapping, Intacct Display name is compared with HubSpot Company name. If an exact match is found SyncQ will connect this record with your
Intacct Customer record, otherwise a new record will be created. You can easily distinguish the new record by looking at the creation date and Intacct Id field value. All Intacct
sync records hold a unique Intacct Id field value.

You can fully automate your sync from HubSpot to Intacct. After creating your HubSpot Intacct mapping, SyncQ automatically adds a field named Sync to Intacct dropdown in the
object with the option to select yes or no. By selecting this value to yes, SyncQ will automatically sync that record to Intacct. You must enable the auto-sync option in the SyncQ
mapping to auto-sync. Using HubSpot workflows, you can set this field value fully automatically implementing your own custom business requirements.
You must be careful on implementing
your automation if your Intacct record is connected with other related records. For example, to sync an invoice, first sync the related customer before
syncing the invoice.


You can also call SyncQ directly from a HubSpot workflow using a Send a webhook action. This example syncs a Company record to Intacct. Use your own portal ID and mapping ID, and select the record type that matches your SyncQ mapping.
Open the SyncQ app, click My Settings, and find Workflow Secret in My SyncQ subscription. A SyncQ admin can click Generate to create a secret, then Copy to copy it. Use Show to view it. If a secret already exists, you will see Rotate instead of Generate.
Rotating replaces the current secret. Update every HubSpot webhook using it with the new value.
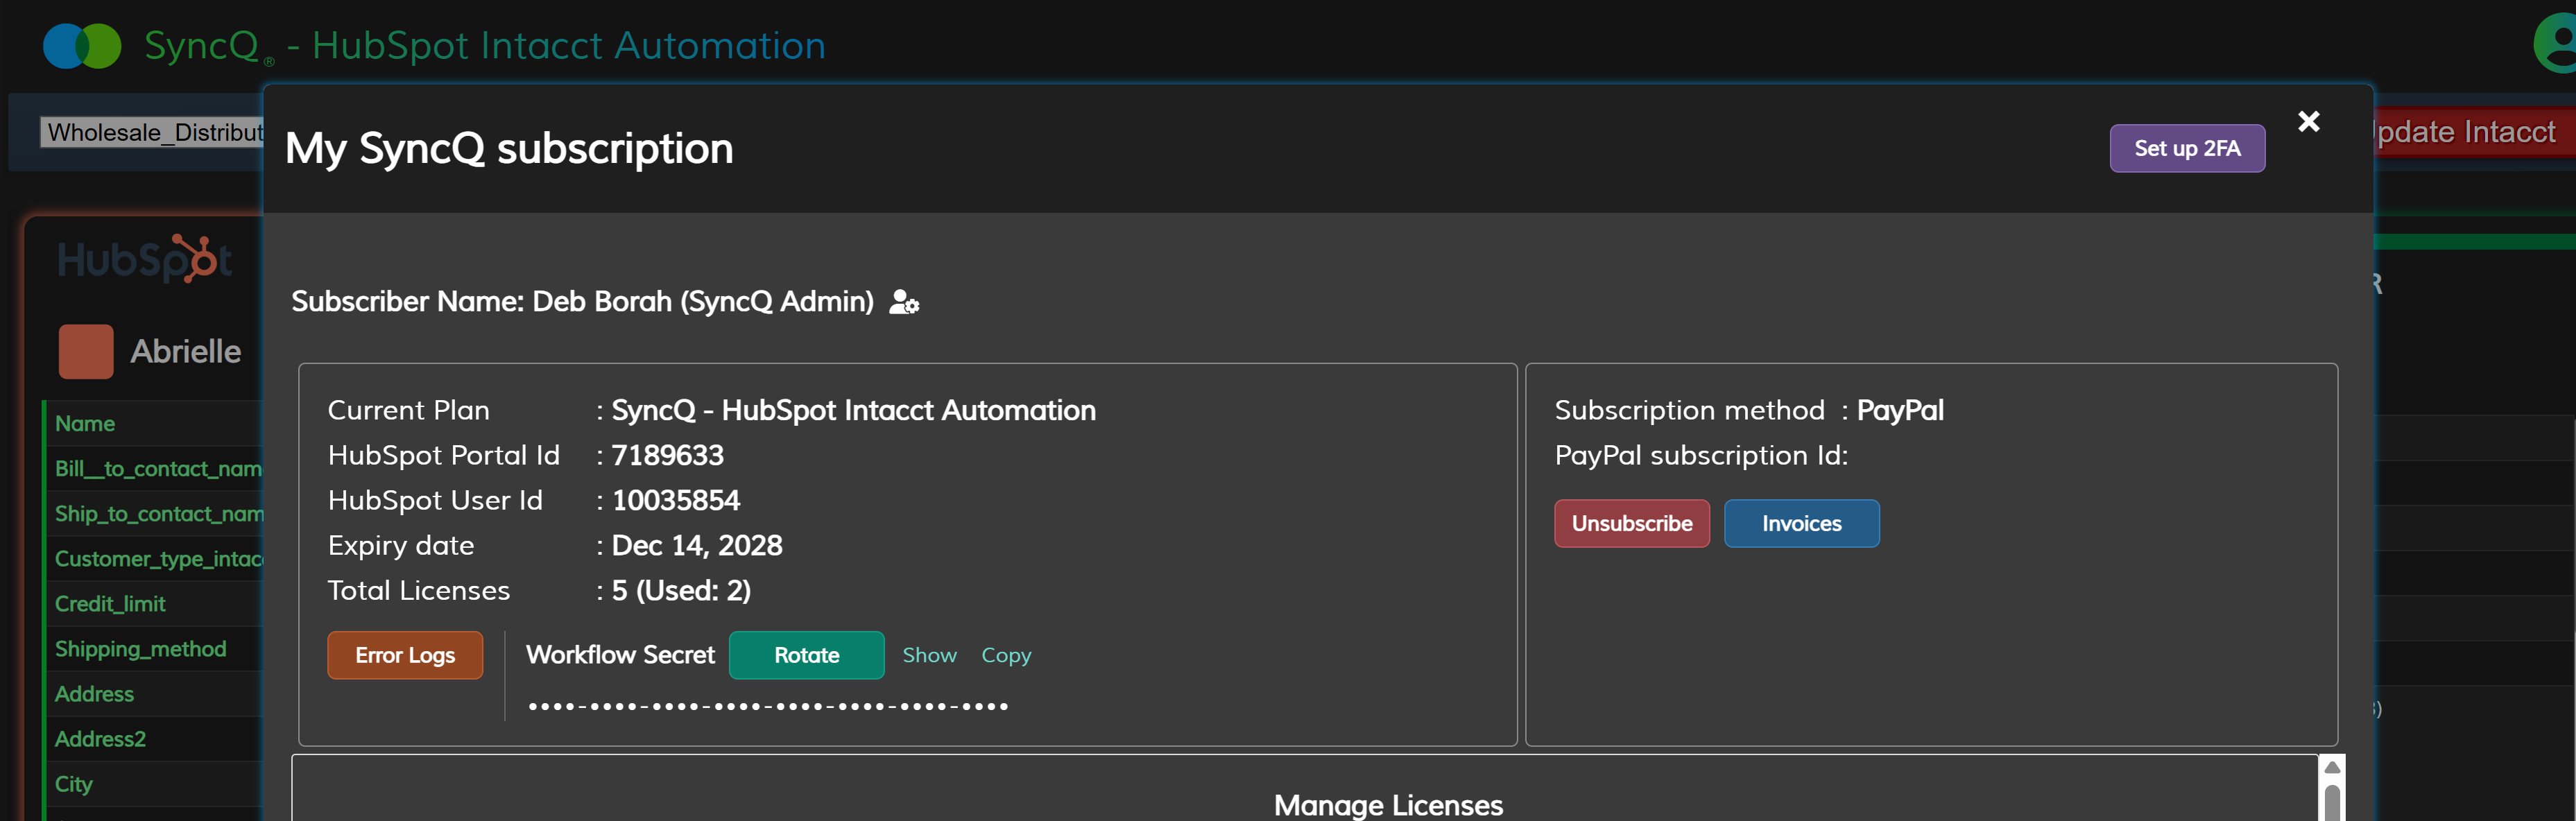
In the webhook action's secrets management screen, choose Add secret. Enter a name such as SyncQAPIKey and paste the Workflow Secret copied from SyncQ as its value. Save it. The name identifies the secret in HubSpot; its value must exactly match the Workflow Secret in SyncQ.

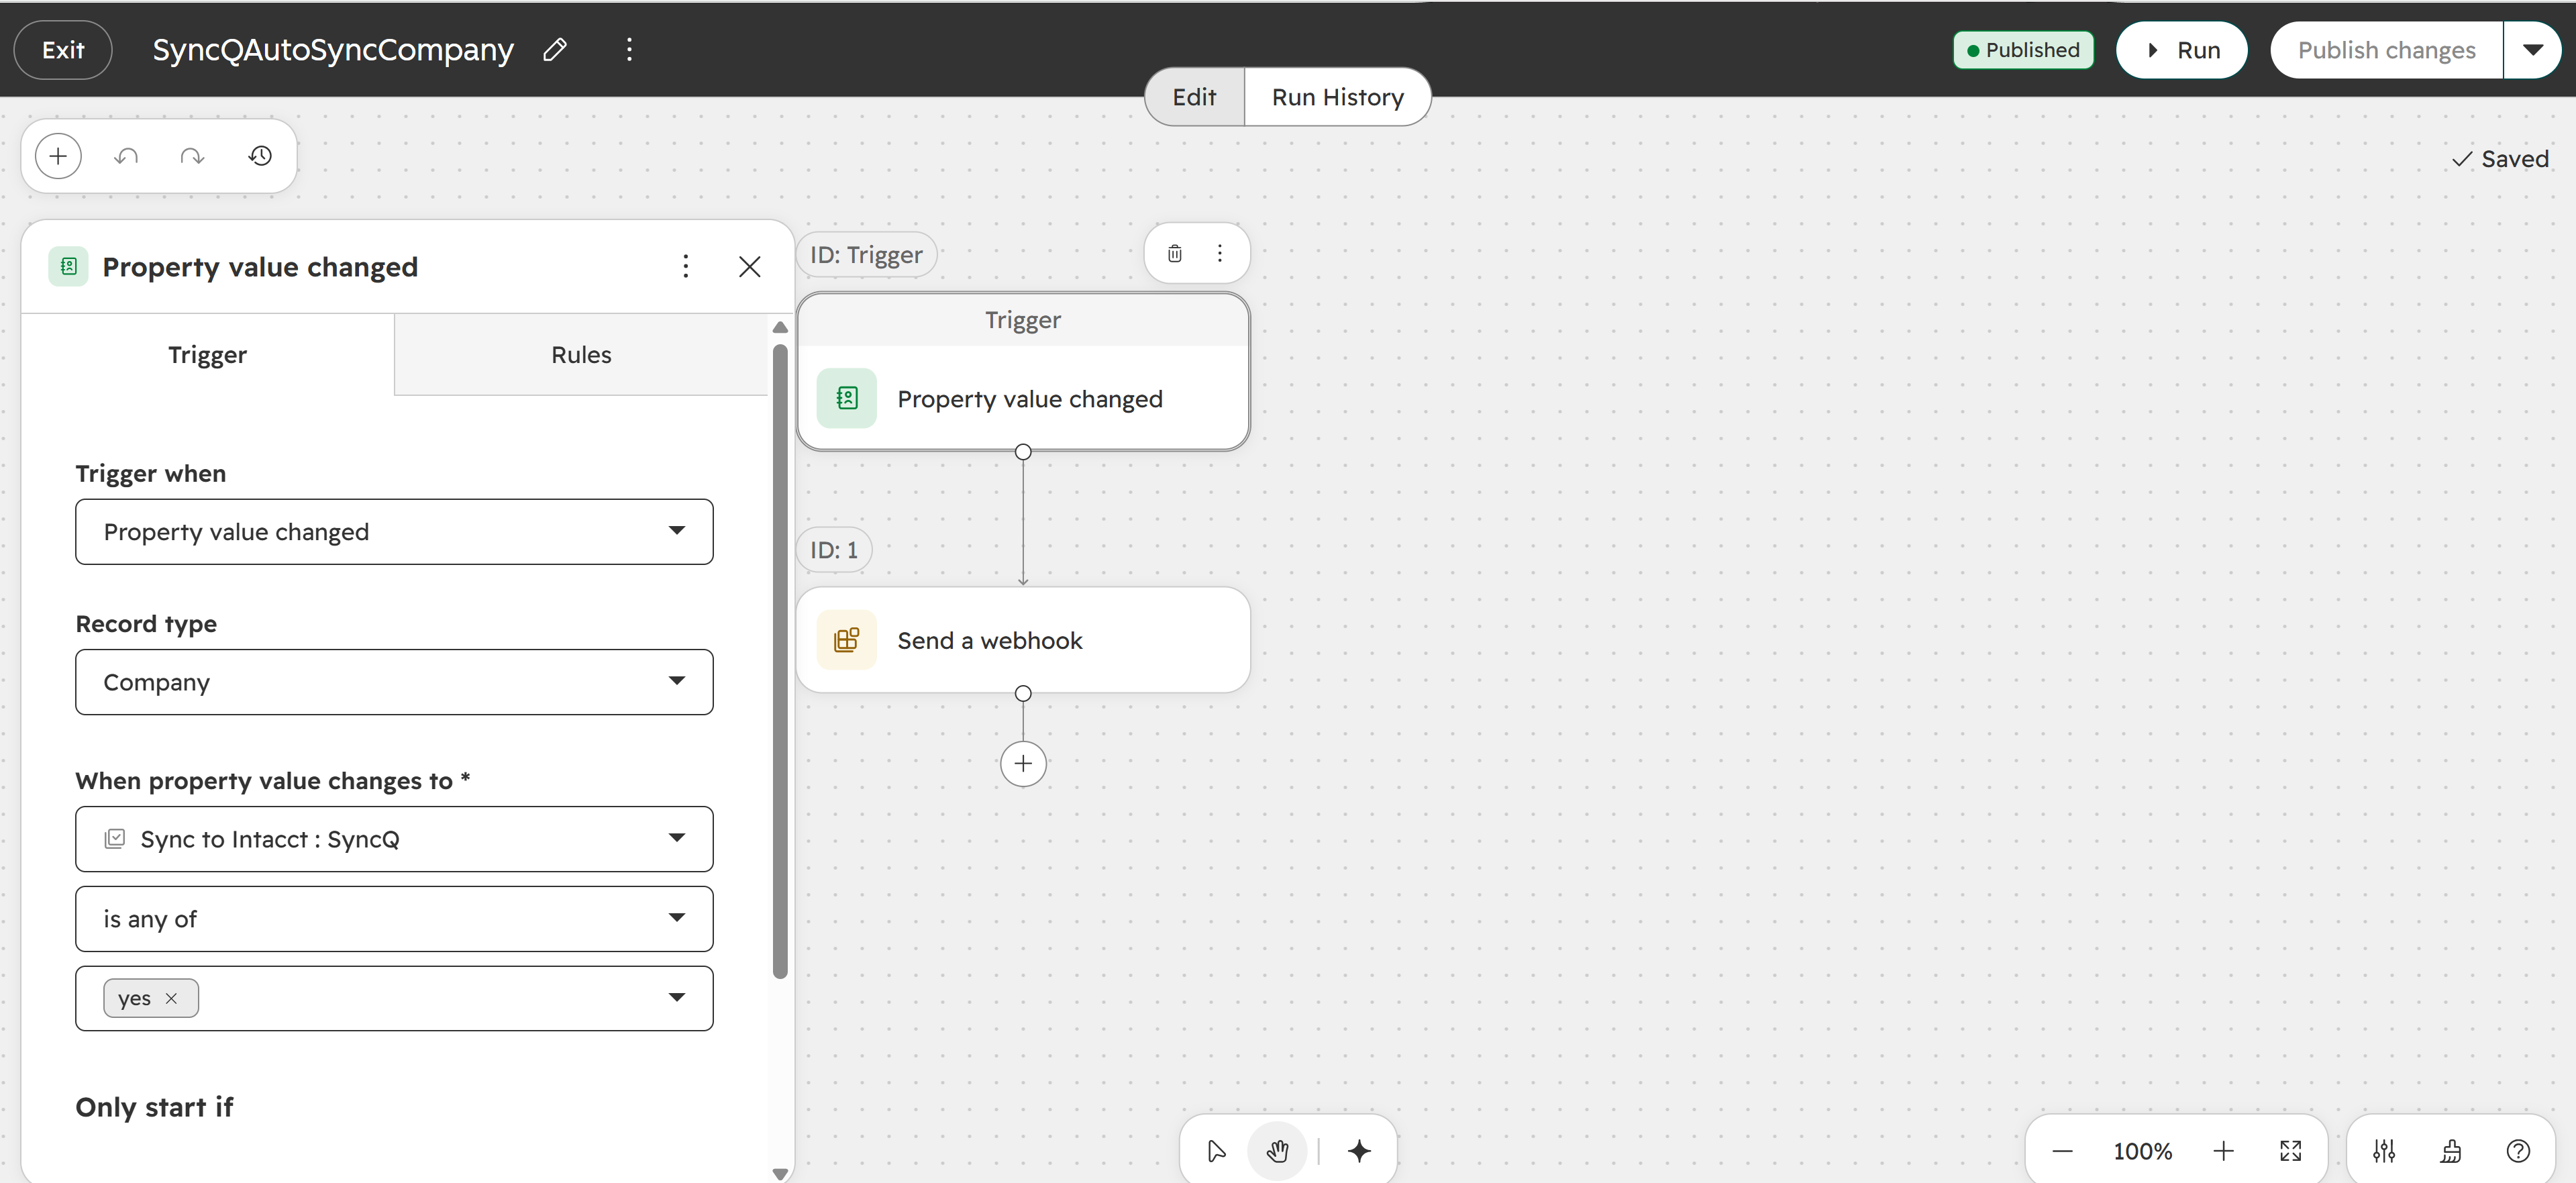
Create a workflow for the mapped record type. Add a trigger and a Send a webhook action, as shown below.
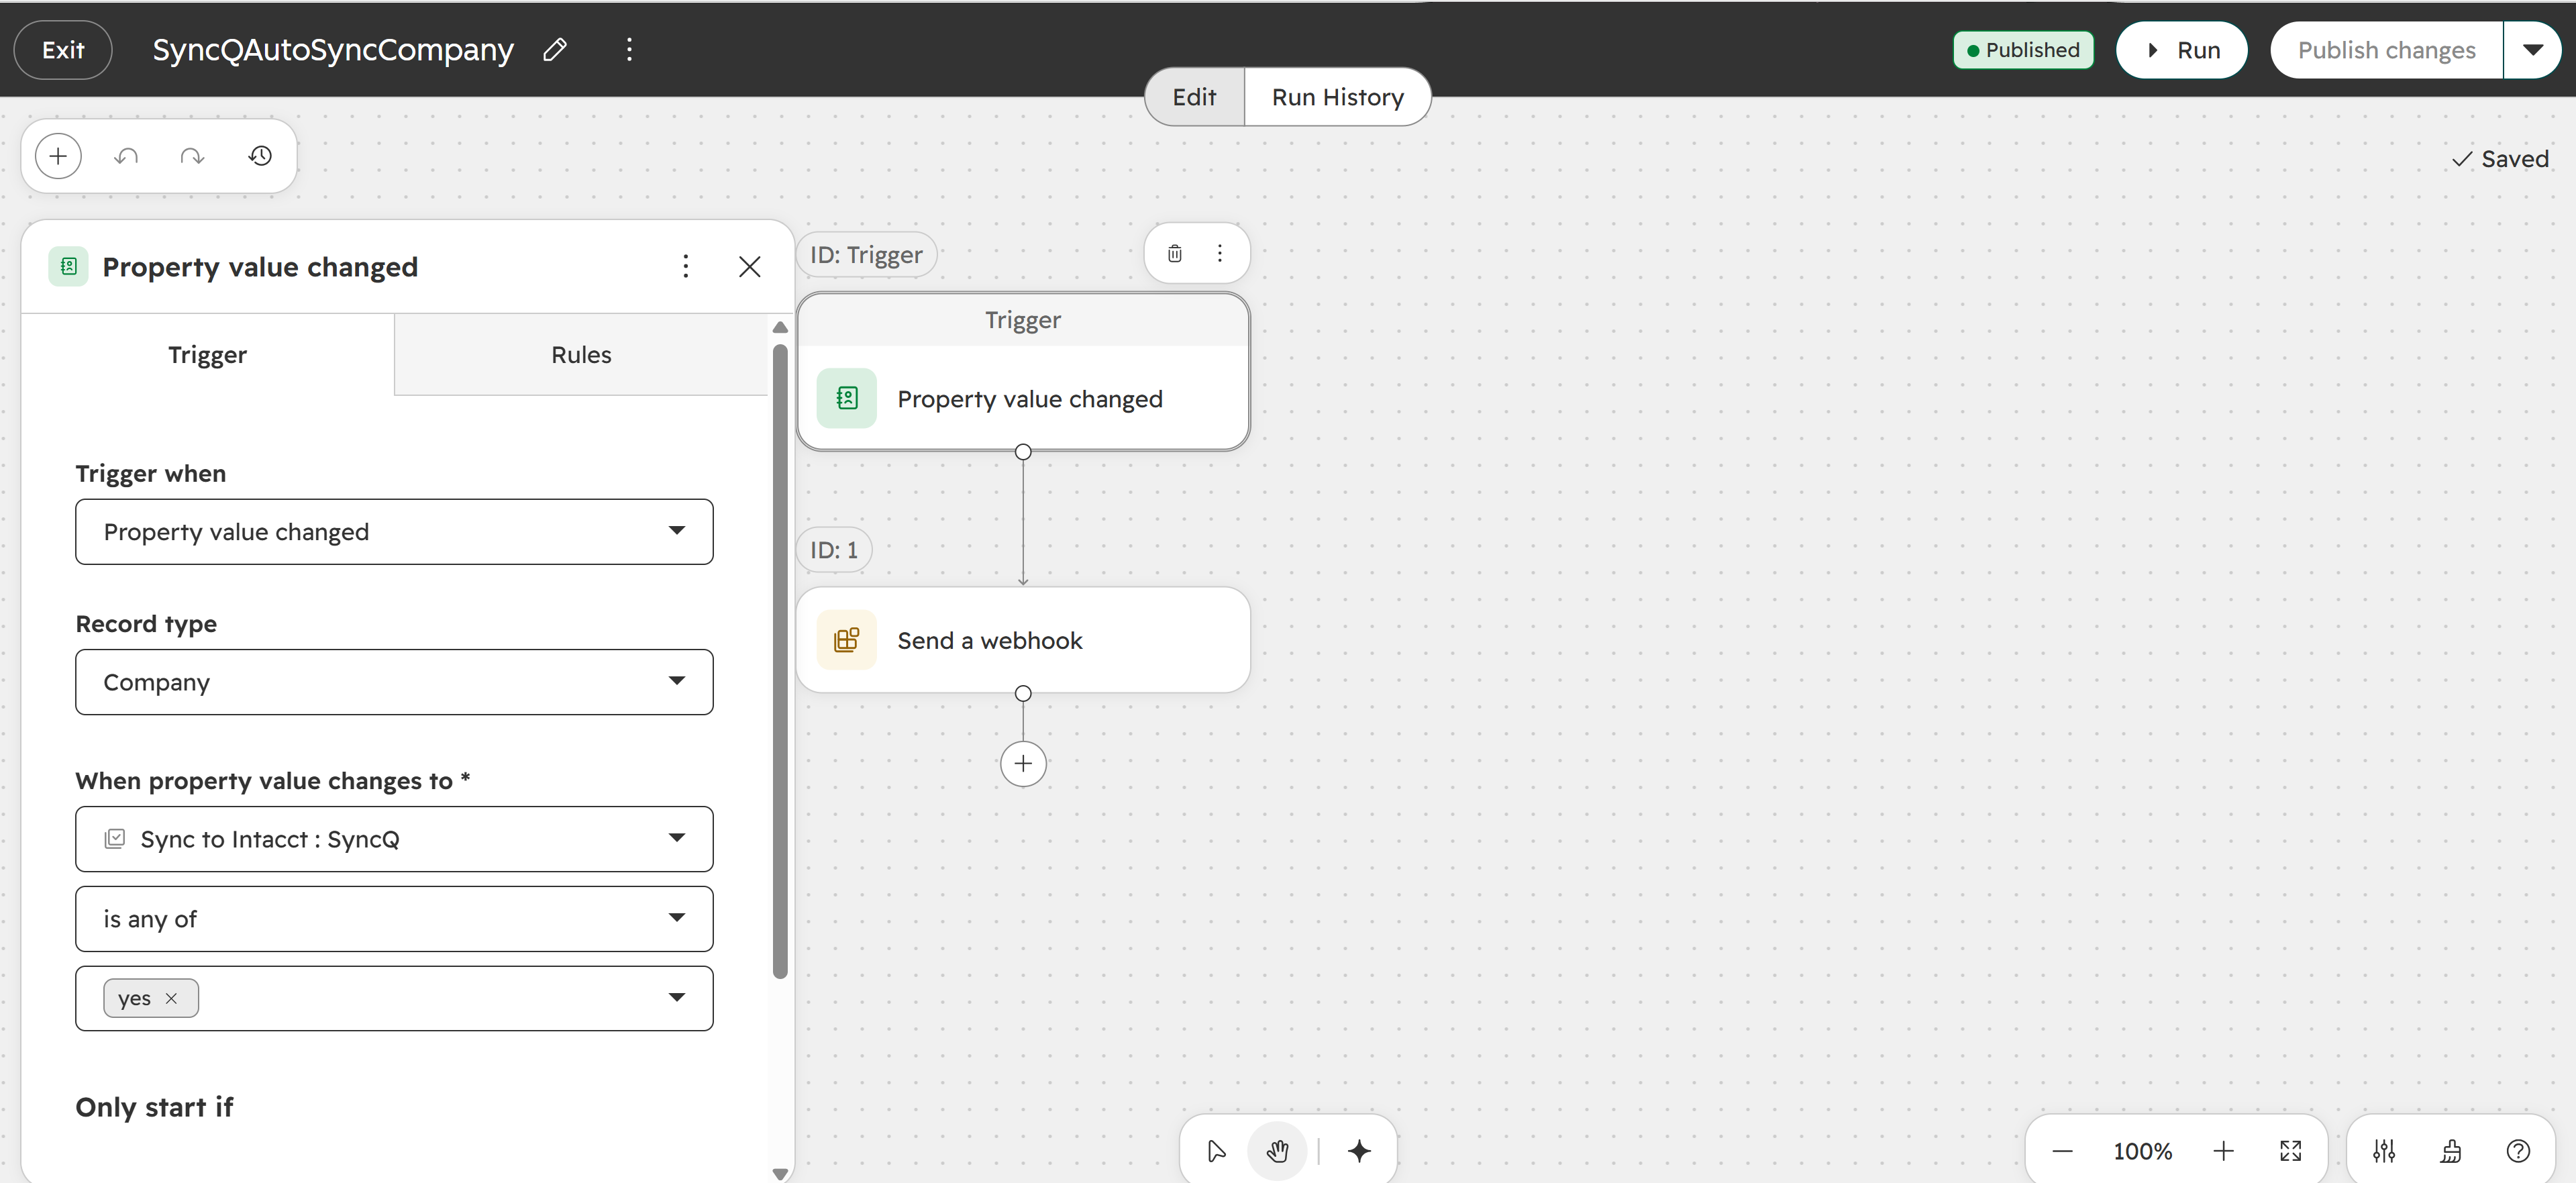
For the Company example, choose Property value changed, set the record type to Company, and select Sync to Intacct : SyncQ. Configure the trigger for the value yes. Add any other rules required by your business process. The record must be marked for sync when SyncQ processes the request.
| Setting | Value |
|---|---|
| Method | POST |
| Webhook URL | https://sga.syncq.net/api/workflow/ |
| Authentication type | API Key |
| API key | Select your saved secret, for example SyncQAPIKey |
| API key name | X-SyncQ-Secret |
| API key location | Request header |
Add these fields to the request body:
| Property name | Value |
|---|---|
record_id | The enrolled record's Record ID token; do not use a fixed record ID |
map_id | Your SyncQ mapping ID, for example 00061 |
portal_id | Your HubSpot portal ID, for example 7189633 |
object_type | The mapped object type, for example company |
Record ID field: the screenshot below shows hs_object_id. The endpoint code described in this guide expects record_id, so use that request property name unless your endpoint has been updated to accept hs_object_id.
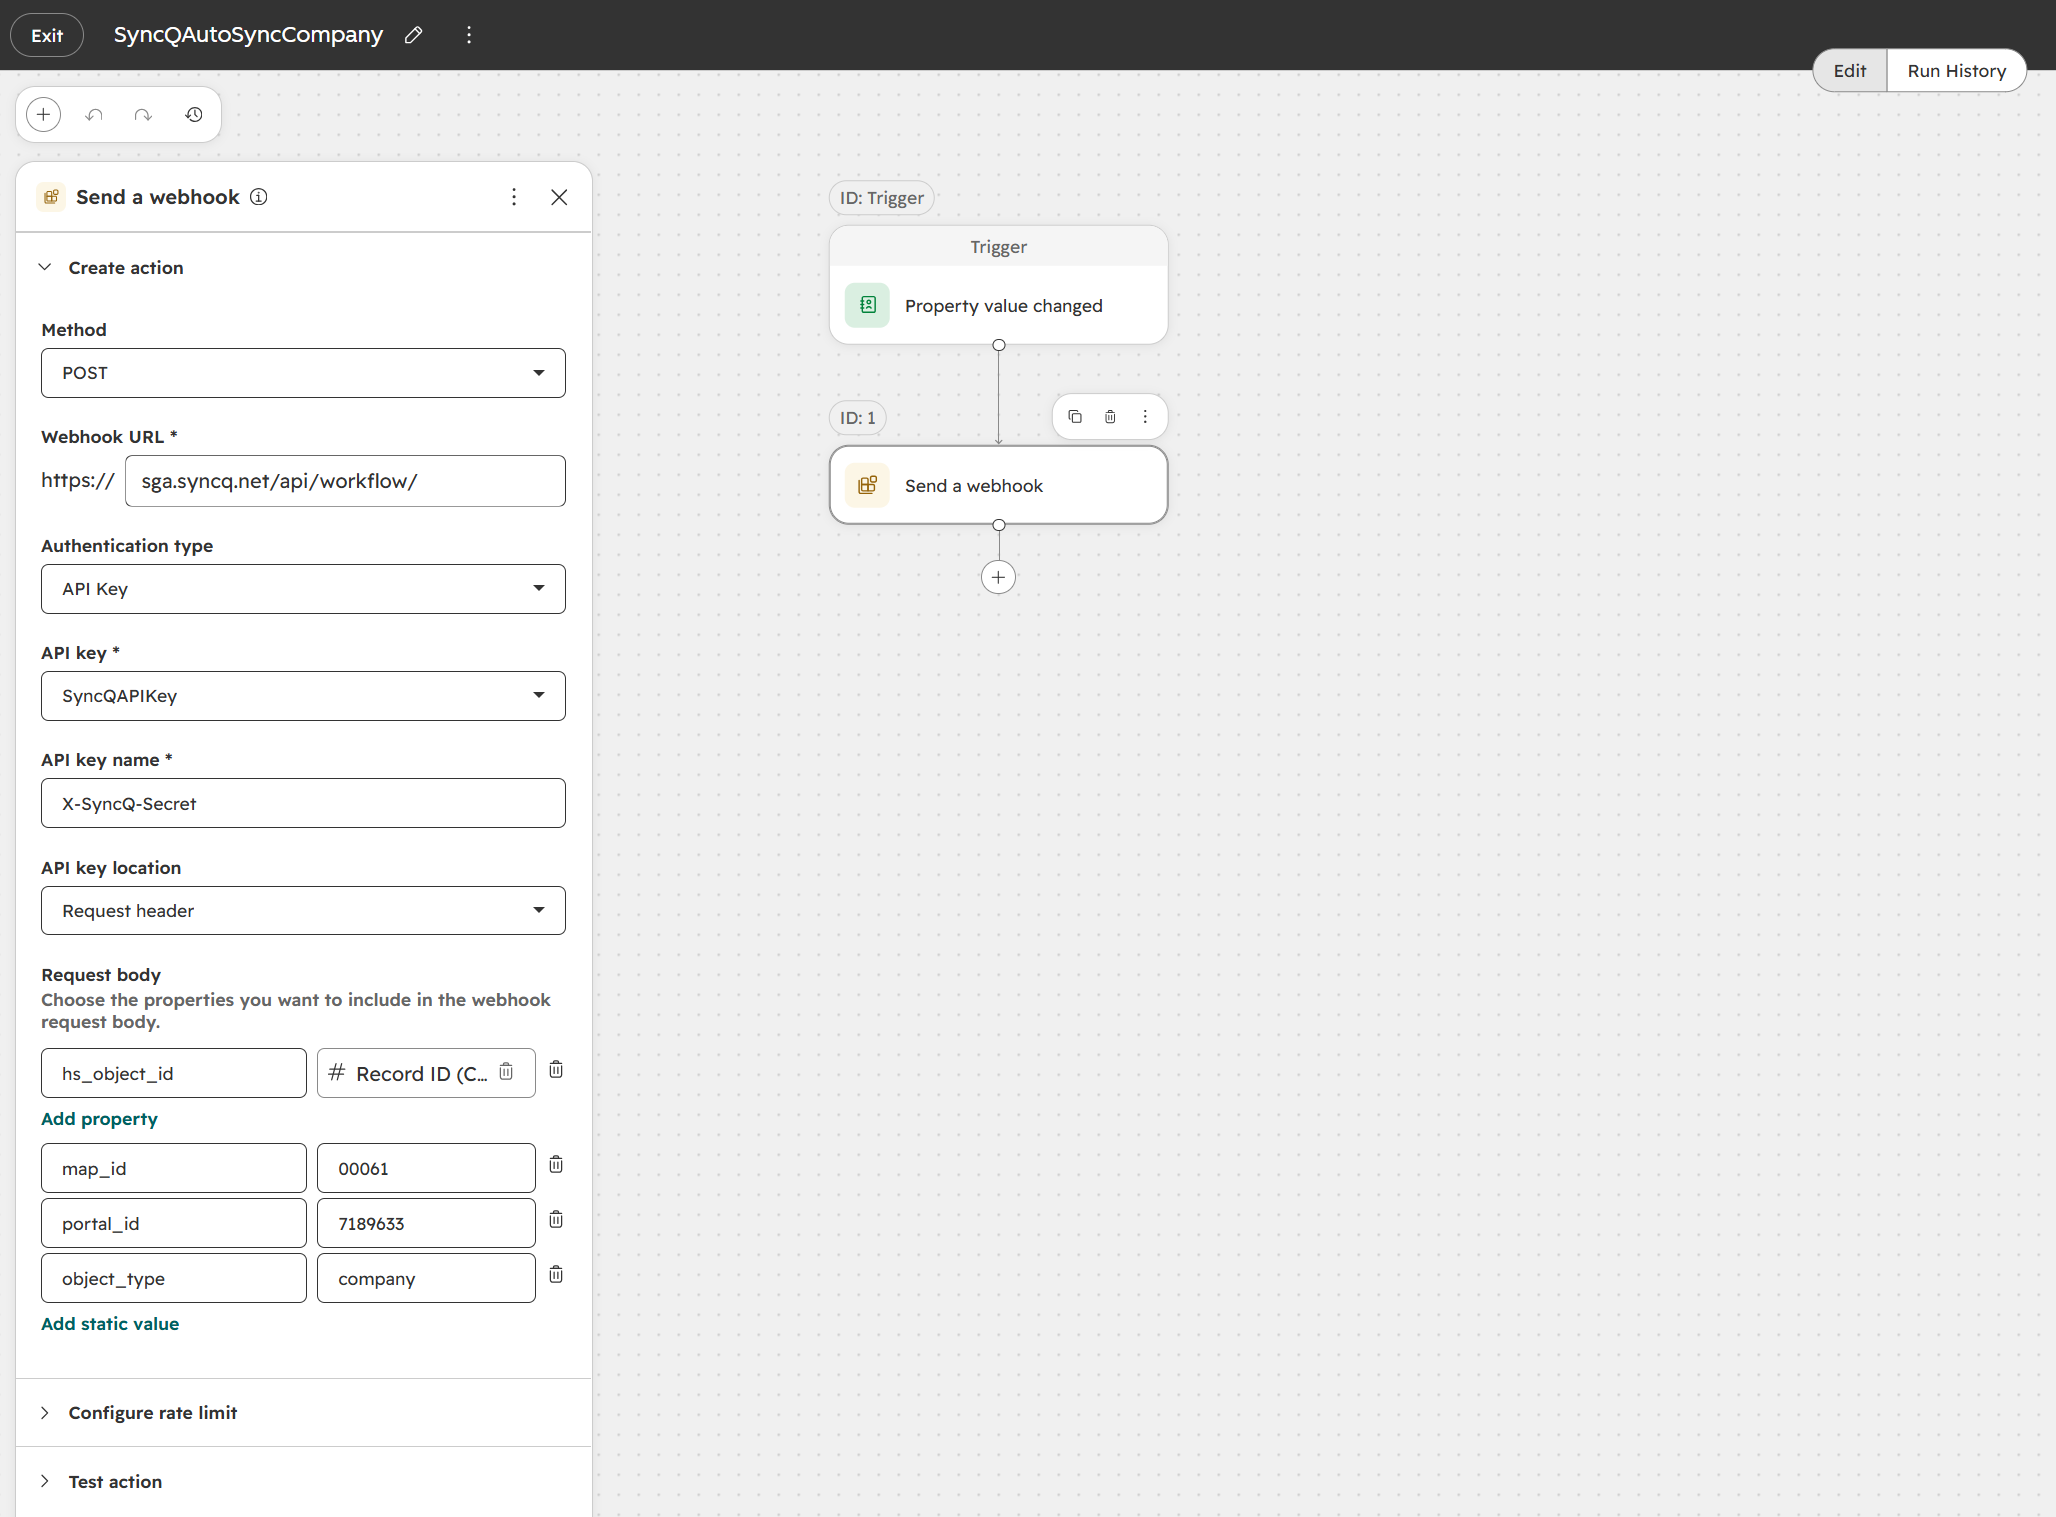
Ensure the selected SyncQ mapping is enabled for export and the user used for the sync has an active SyncQ license. Test with one record, check the workflow run details and the record's Intacct Sync Status, then publish the workflow. Sync related Customers or Vendors before syncing transactions that depend on them.
You can use a HubSpot workflow to associate records by matching property values. For example, associate a Contract Invoice with its Customer (represented by a Company in HubSpot) or with its Contract. The same approach can be used for other standard and custom objects available in your workflow.
Both records must contain the same identifier. Map the relevant Intacct reference fields to HubSpot properties in SyncQ so these values are populated during sync.
| Association | Property on Contract Invoice | Matching property on related record |
|---|---|---|
| Contract Invoice to Customer | Customer Id | Company: Intacct Id : SyncQ |
| Contract Invoice to Contract | Contract Id | Contract: the property containing the same Intacct Contract ID |
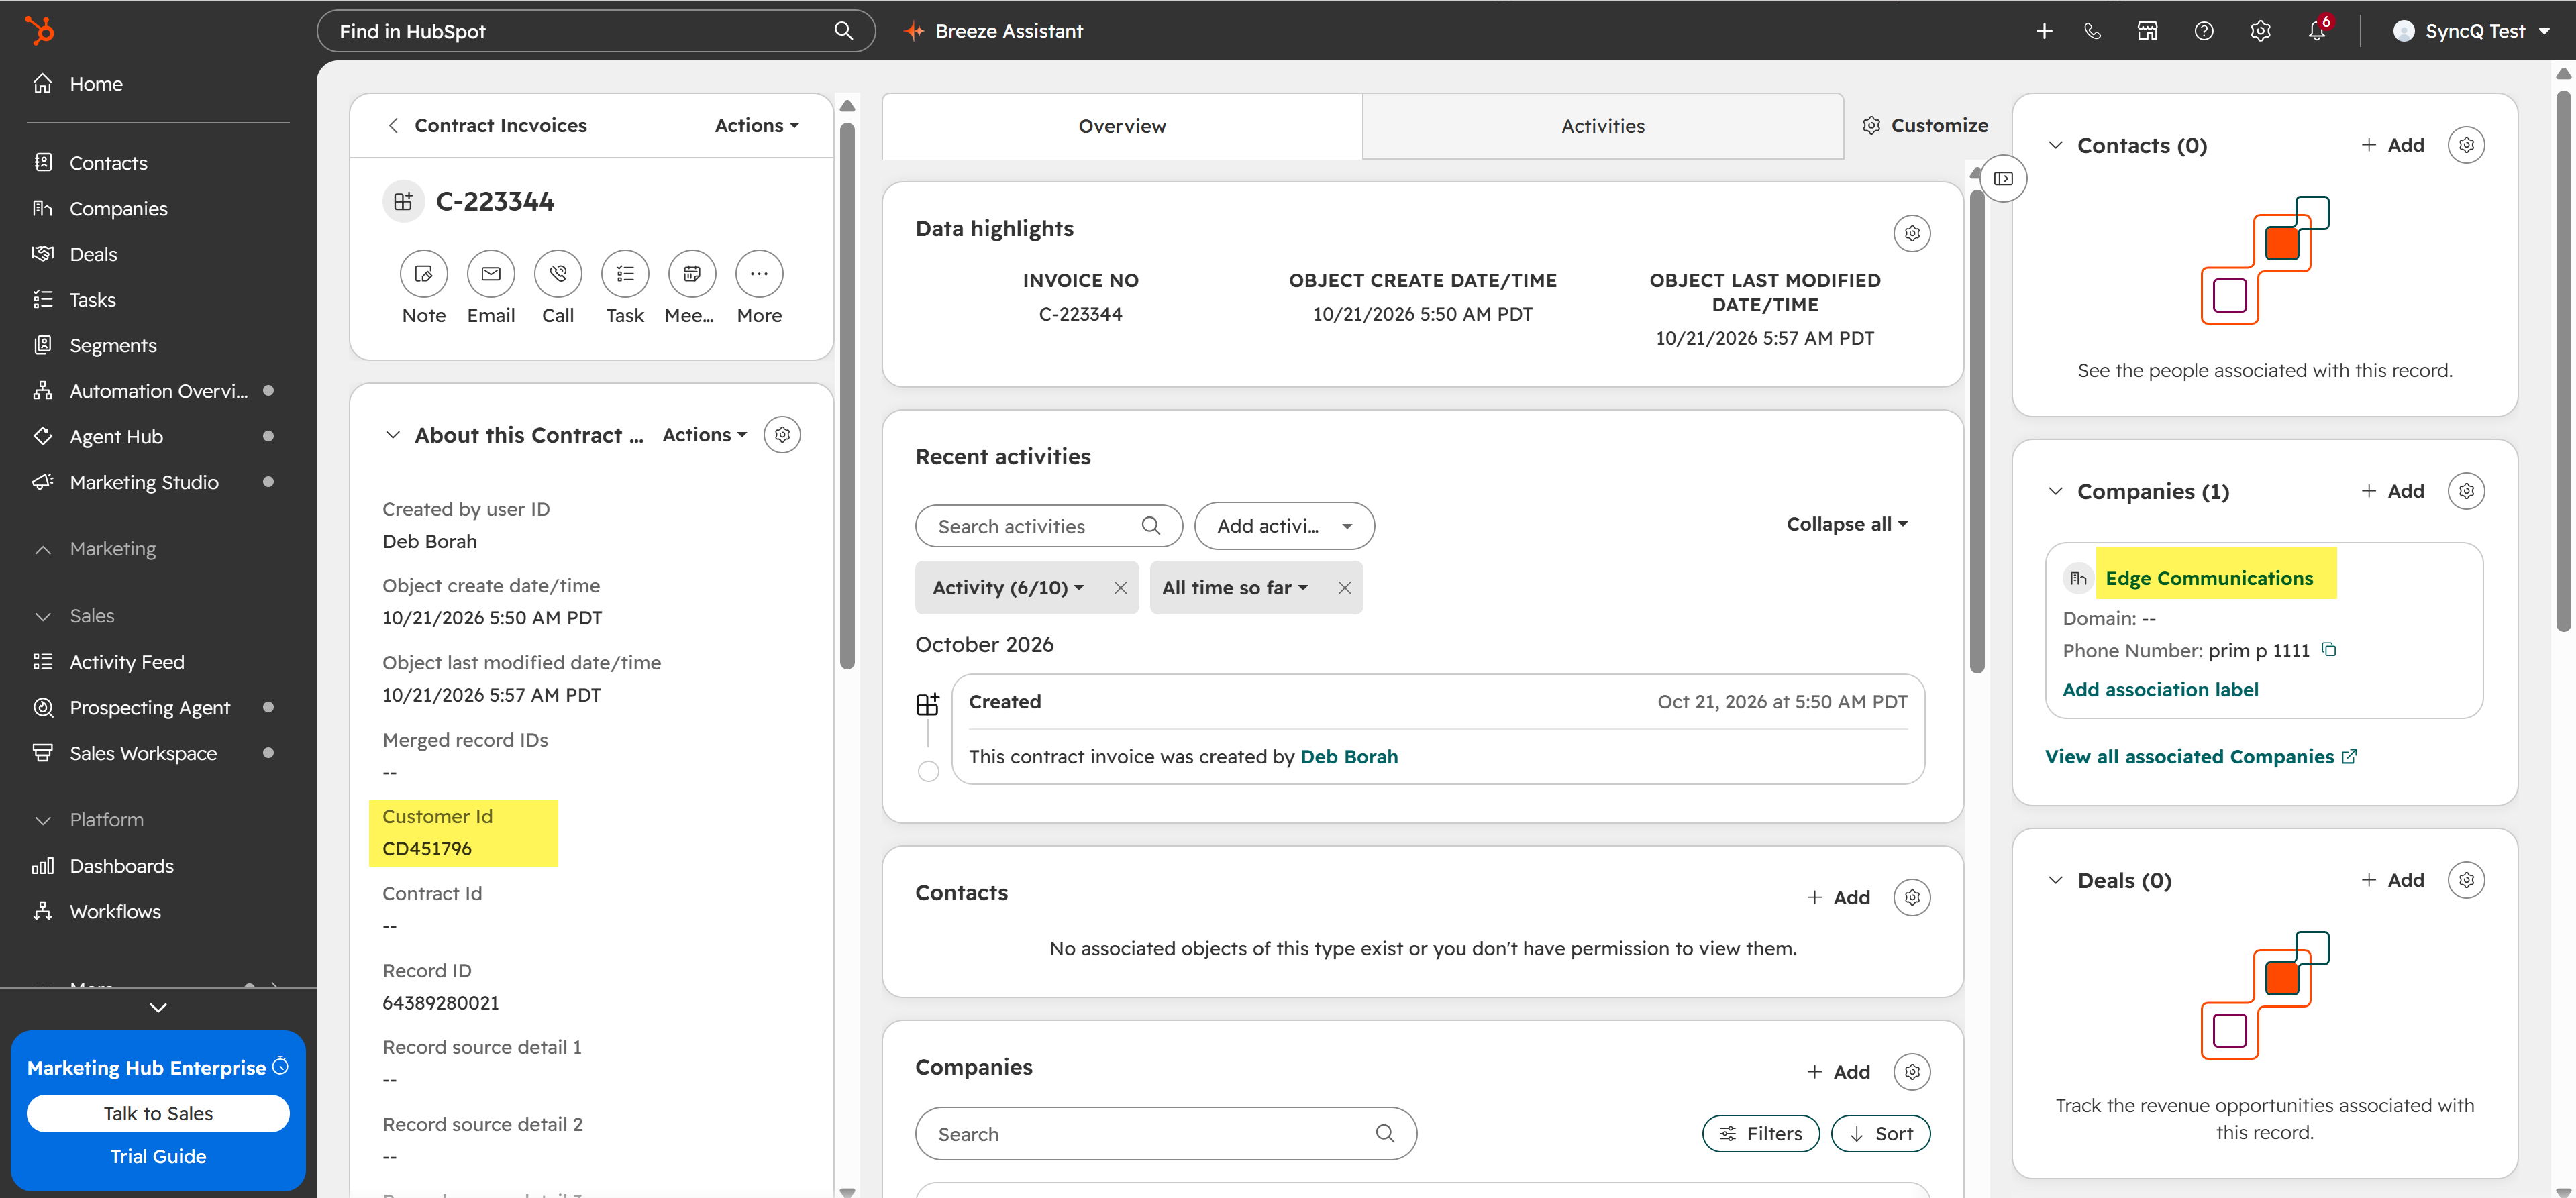
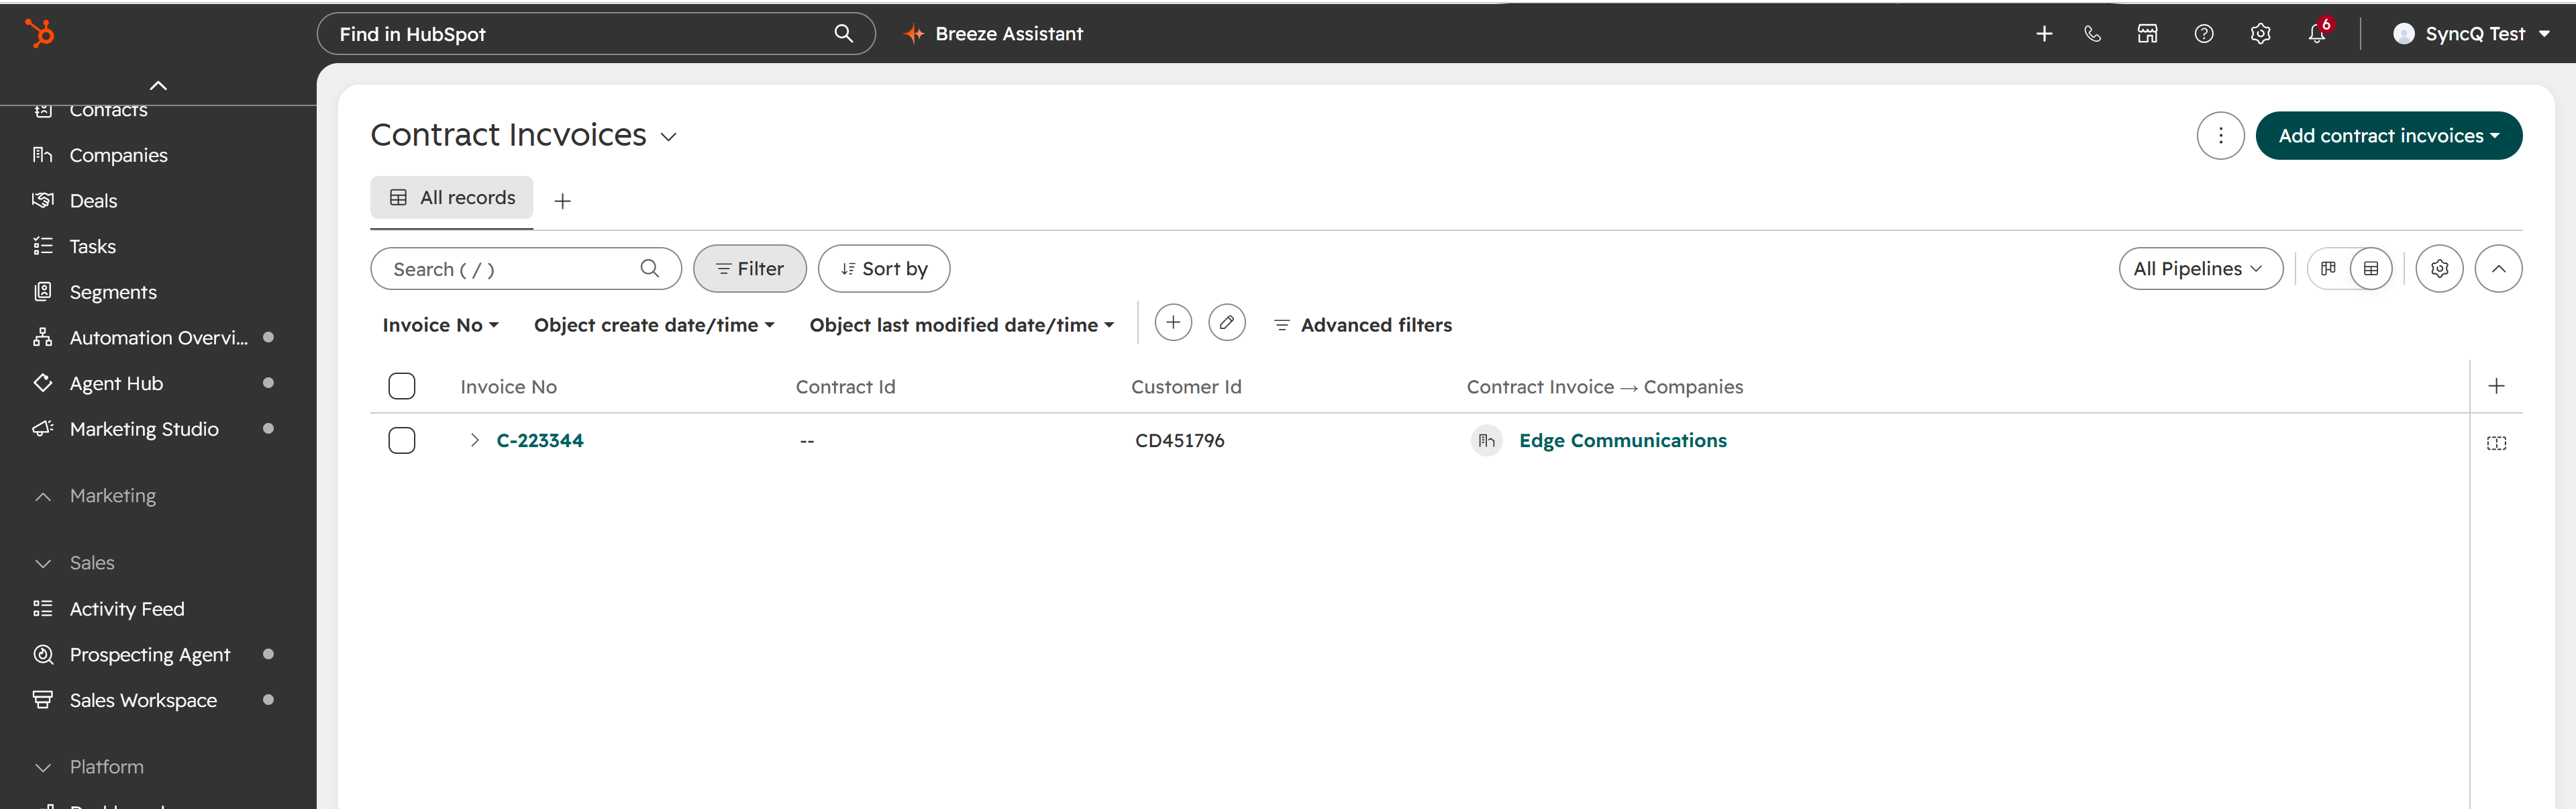
For example, the Customer Id on the Contract Invoice is CD451796. The corresponding Company, Edge Communications, has the same value in Intacct Id : SyncQ.
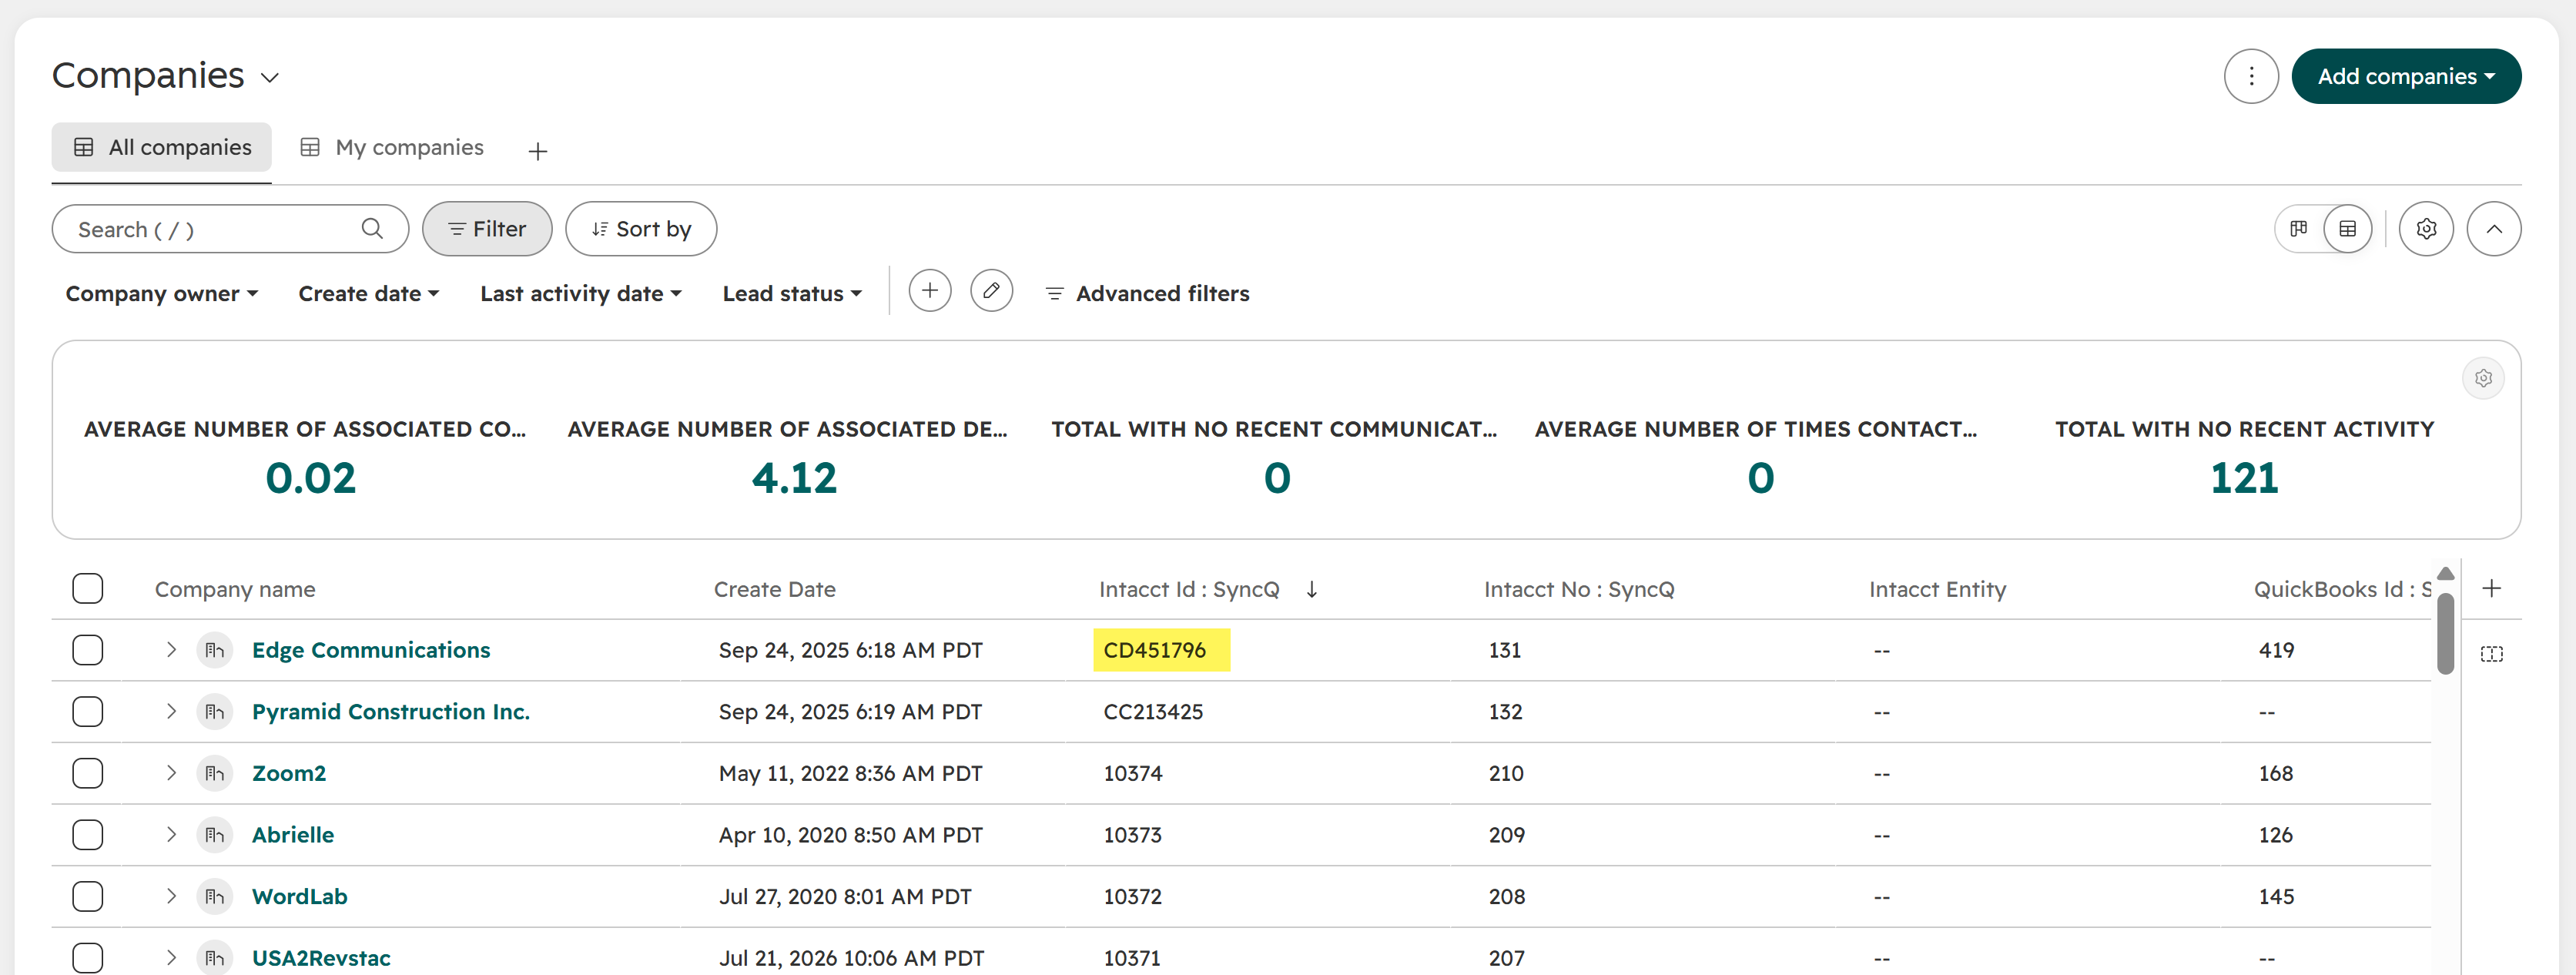
Use matching identifiers rather than record names. Ensure the identifier identifies the intended related record uniquely. The related Company or Contract must already exist in HubSpot and contain its matching ID before the association action runs.
In HubSpot, open Workflows and create a workflow for Contract Invoices, or the source object you want to associate.
For the Customer association, configure the enrollment trigger as Property value changed, select Customer Id, and set the new value condition to is known. For a Contract association, use Contract Id instead.
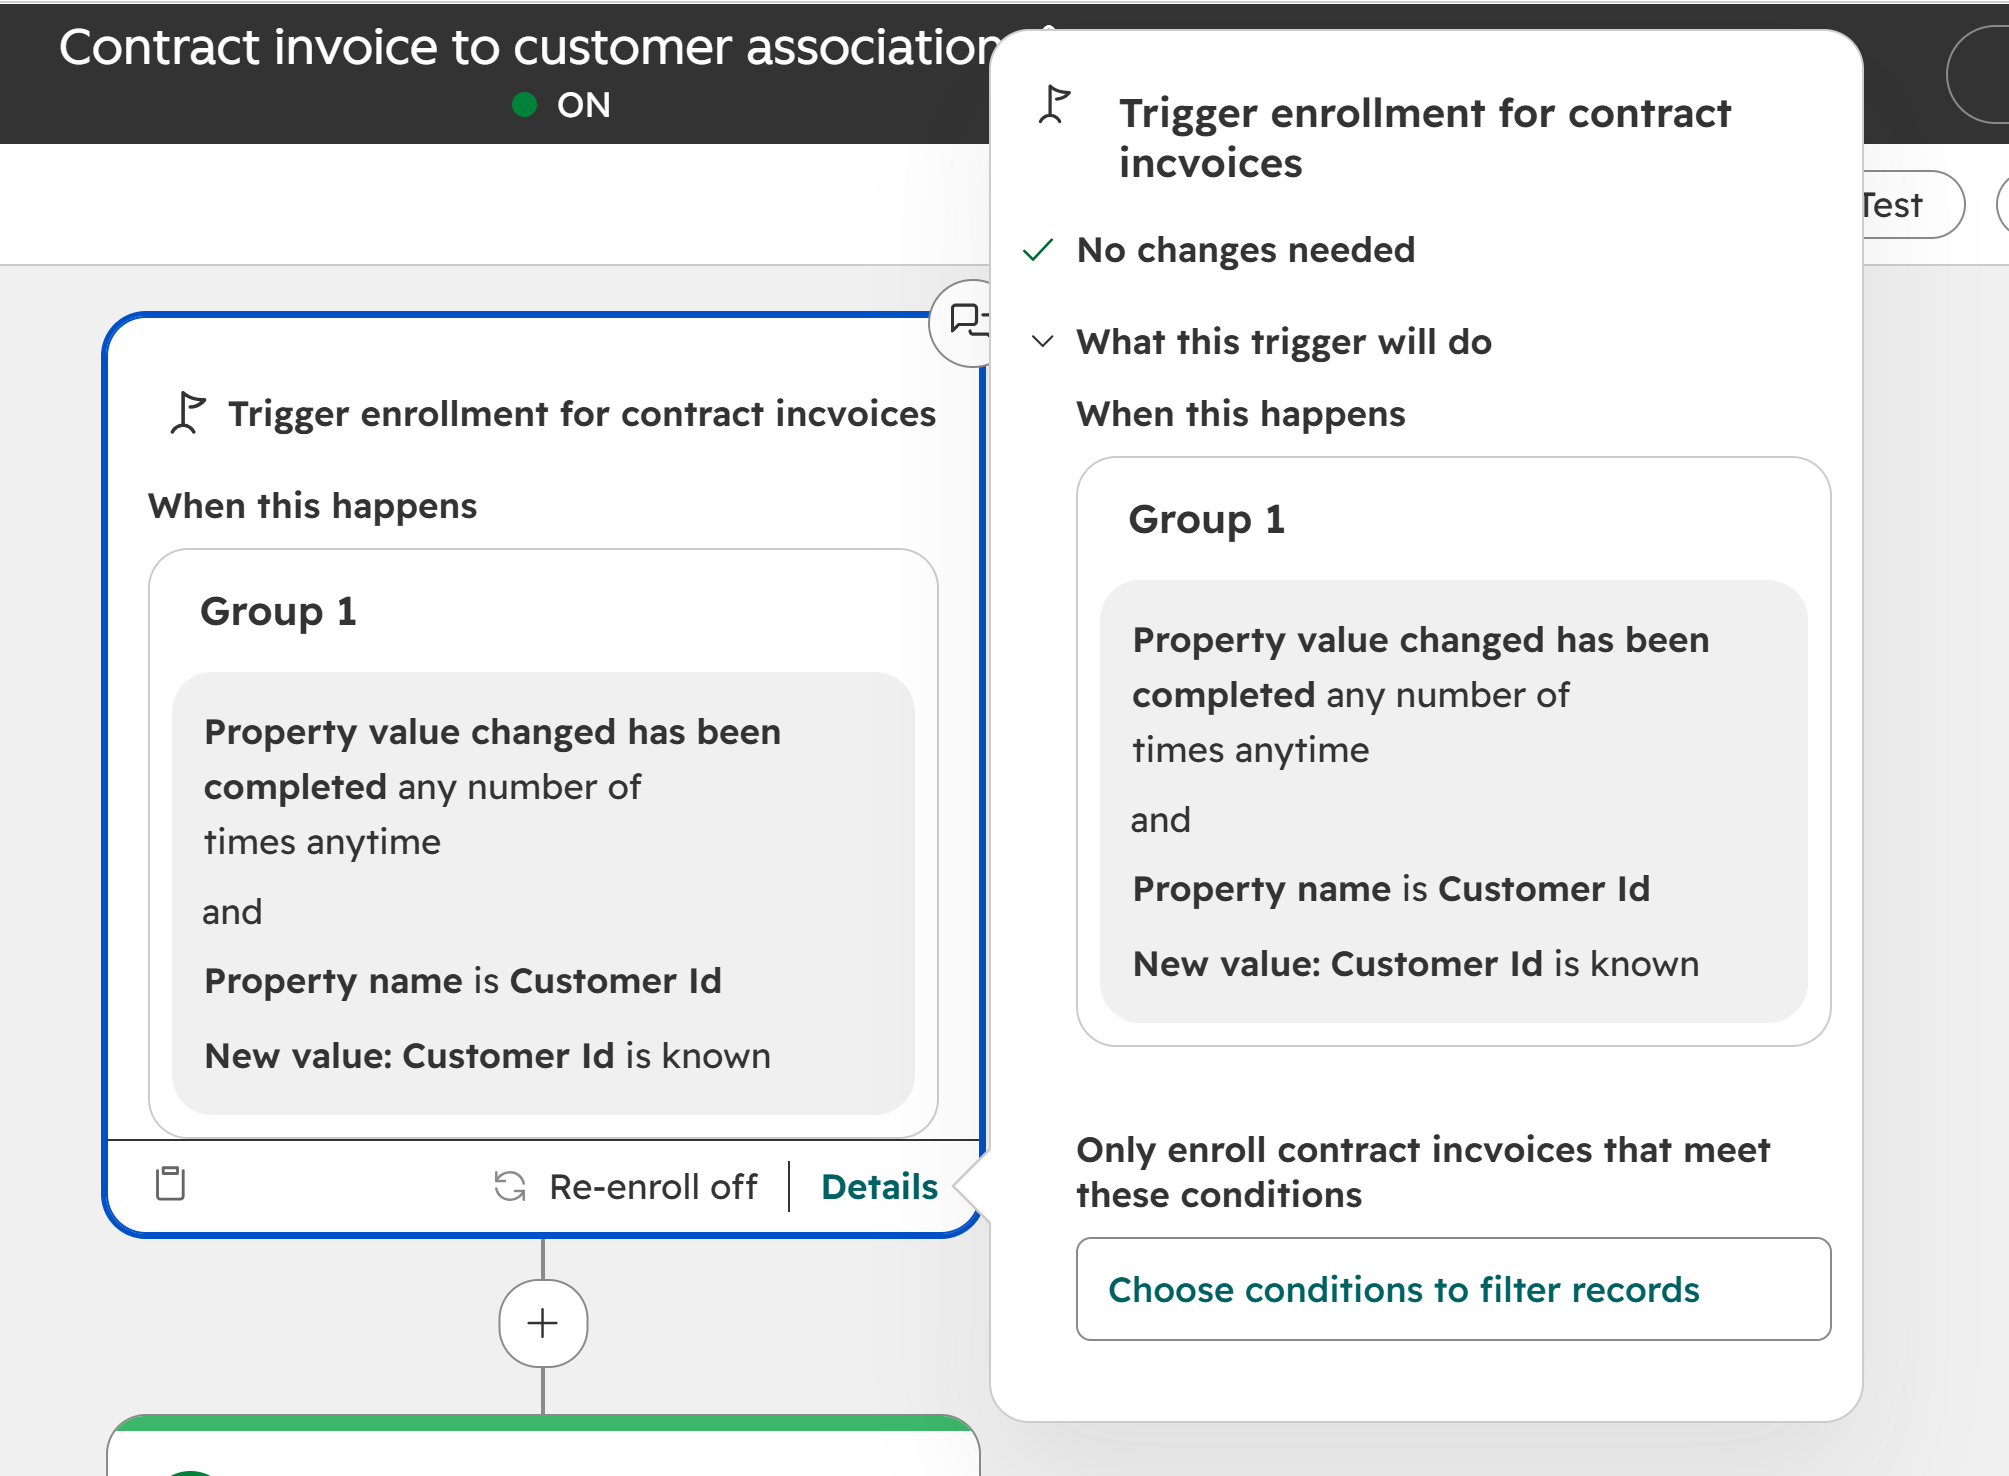
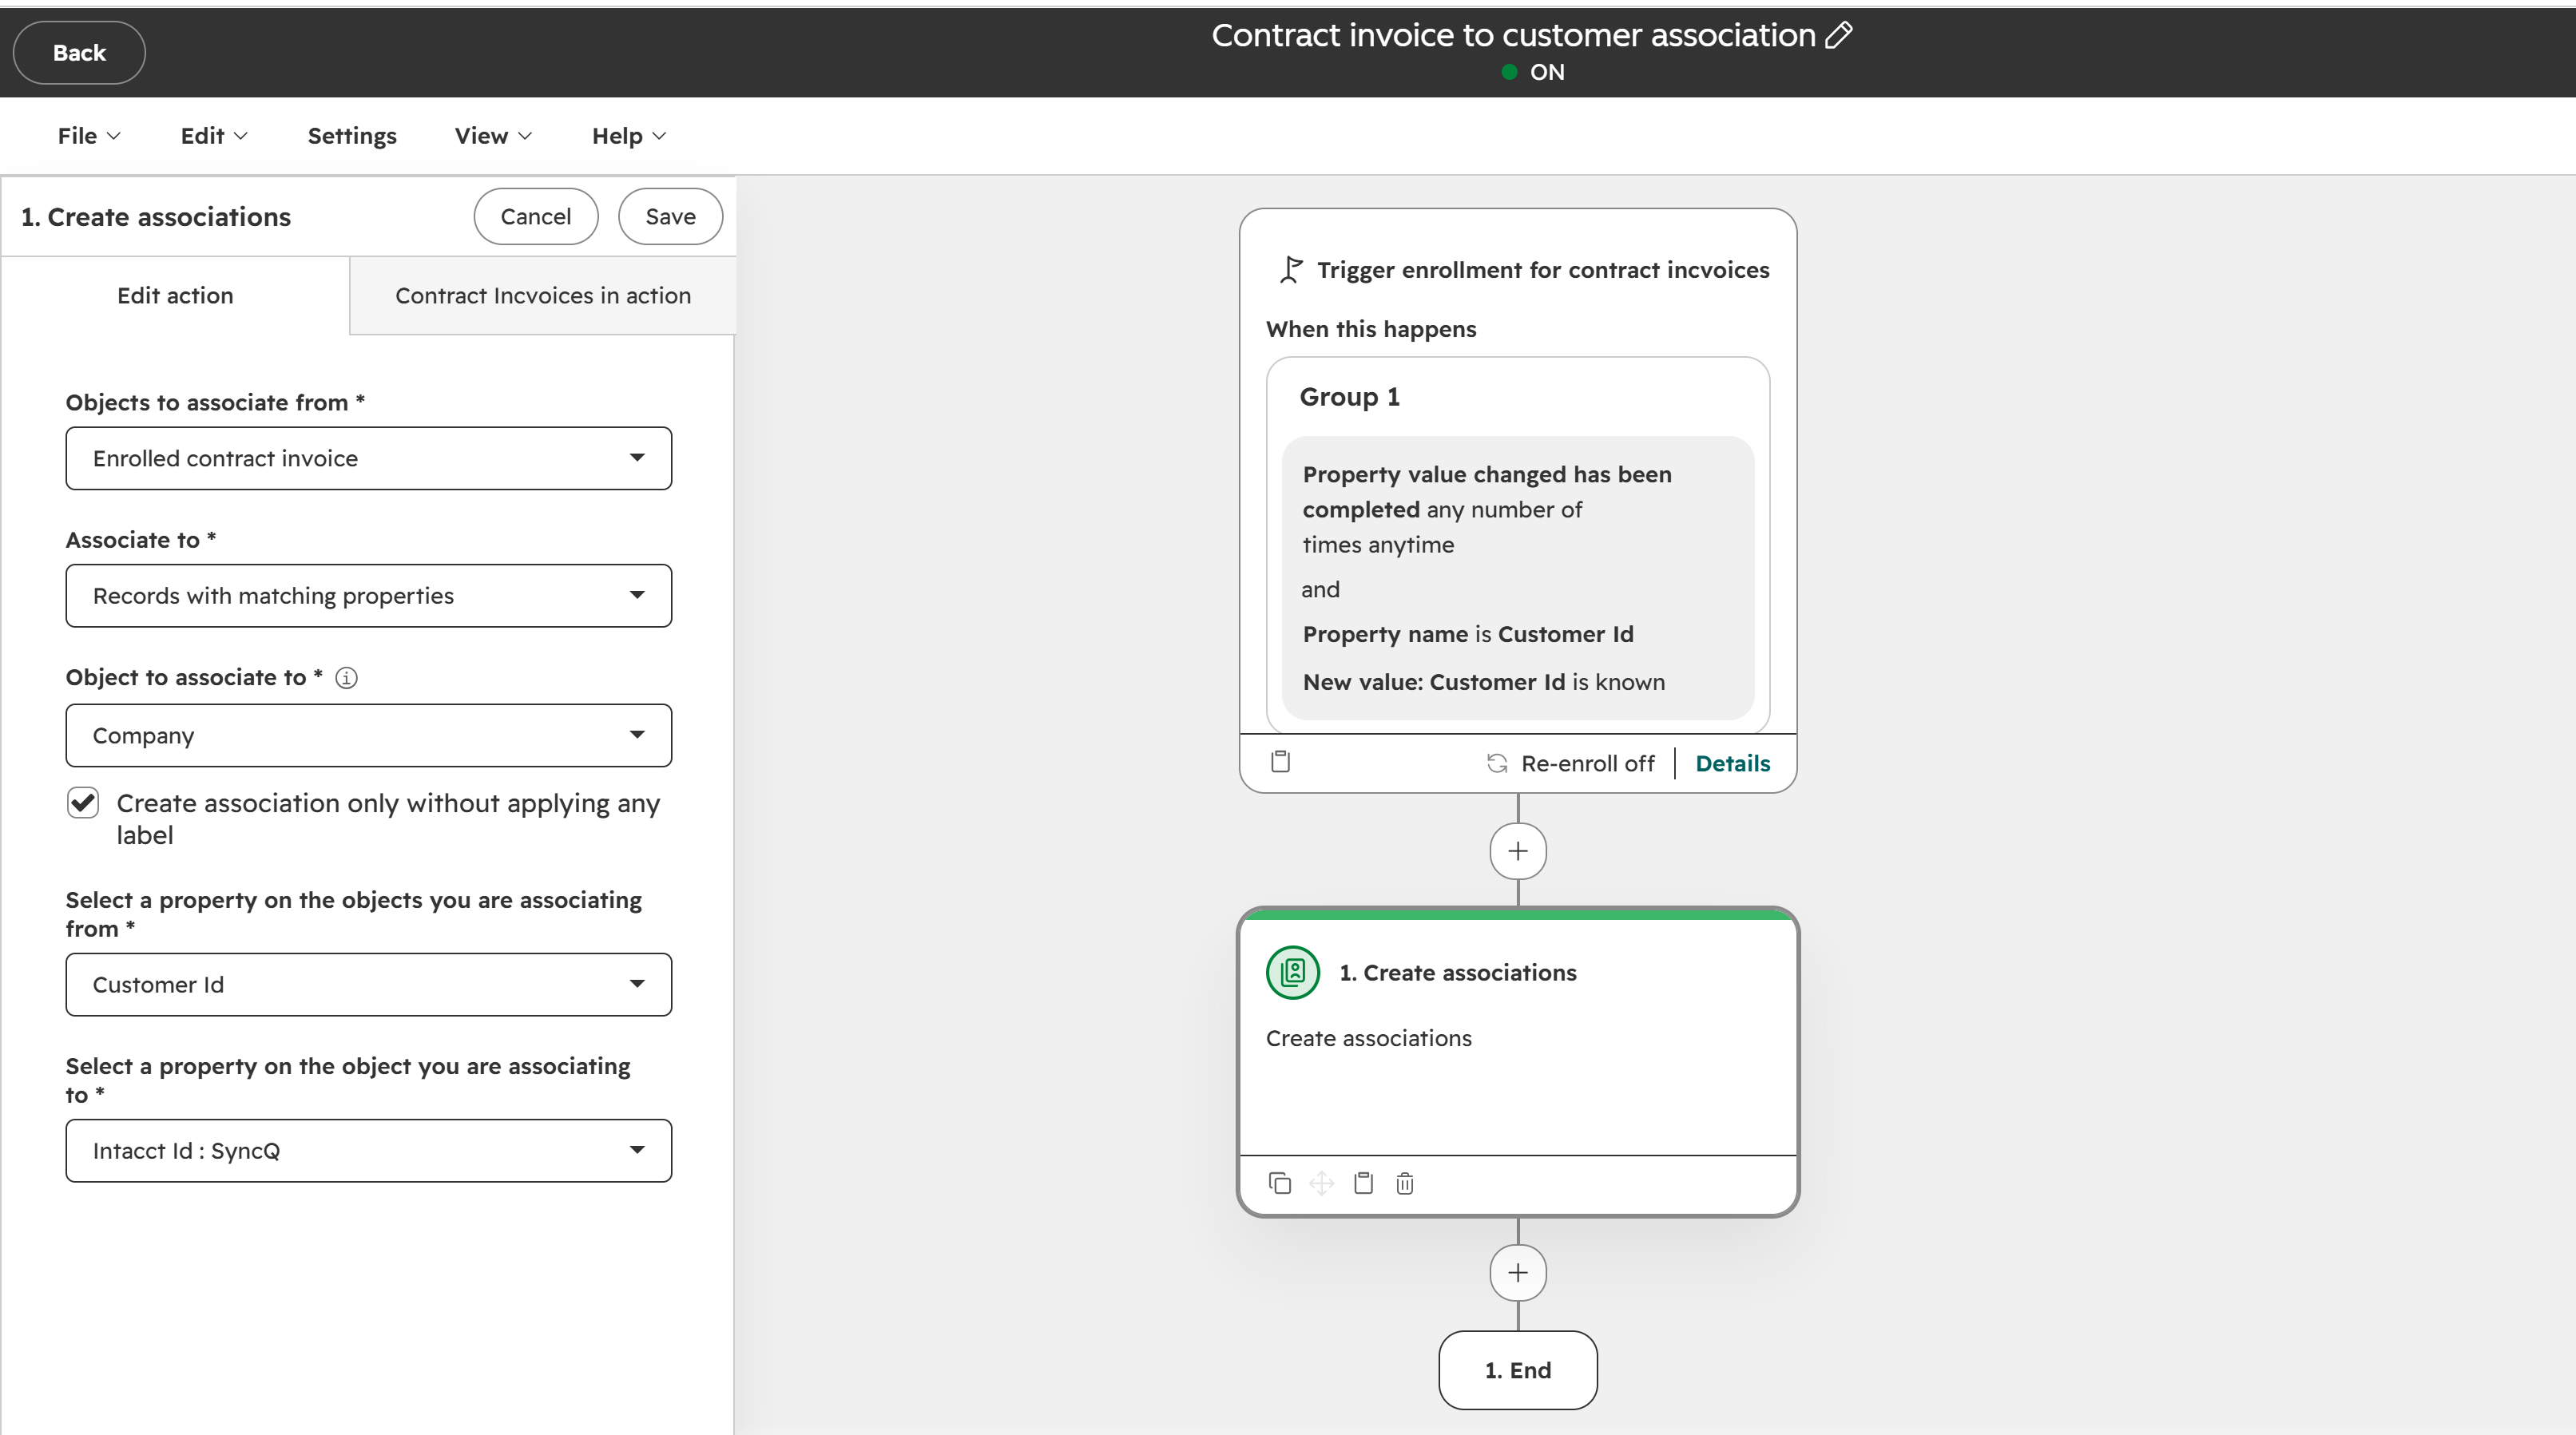
Click the + below the trigger and add Create associations. Configure the Customer association as follows:
| Setting | Value |
|---|---|
| Objects to associate from | Enrolled contract invoice |
| Associate to | Records with matching properties |
| Object to associate to | Company |
| Association label | Select Create association only without applying any label, or select a label appropriate to your process |
| Property on the source object | Customer Id |
| Property on the target object | Intacct Id : SyncQ |
Click Save. To associate the invoice with a Contract, add another Create associations action or create a separate workflow. Select your Contract object as the target and match the invoice's Contract Id with the property holding the same Intacct Contract ID on the Contract.
Test with one Contract Invoice whose Customer Id matches an existing Company's Intacct Id. Review the workflow results, then open the invoice and check that the correct Company appears in its associations. Review and turn on the workflow when the test succeeds.
You can also add an association column to the Contract Invoices list view to see the related Companies alongside each invoice.
Didn't find an answer to your question?